Succulent Pumpkins
Demystifying this Hero of Harvest Decor


You see them all over Pinterest and Instagram. You want one on your kitchen counter grouped with a candle and fresh flowers, or on your dining room table at each setting with a placecard propped against it. Or maybe you want to give a few as hostess and teacher gifts this season.
But you never thought you could actually make one. Where do I get succulents? Aren’t they expensive? Won’t glue kill the roots? How long will this last? How do I take care of this? What should I do with them when Thanksgiving is over?
Allow me to demystify this DIY project for you. It’s EASY and doesn’t have to be expensive! You can get everything you need from a mix of local and online retailers. This is a craft project using living succulent cuttings. There’s no planting involved, so you don’t need to carve your pumpkin and deal with dirty potting mix.
If you’re on Instagram, check out my reel “How to Make this Fall Favorite”. But for all of the juicy, in-depth explanations and sources, please read on…
the 4 things you’ll need
Pumpkin. This is your blank canvas. Two thirds to three quarters of it will still show after you’ve crowned it with succulents, so choose one you love. I prefer real pumpkins on the small side with long, curving stems, but you can definitely do this same process with much larger varieties and even artificial pumpkins. A less expensive pumpkin will help keep your project cost down, as will a smaller pumpkin, since you won’t need as many succulents to crown it.
Pro tip: If you opt for the real thing, shop for pumpkins that are being sold indoors where they’re protected from rain and heat that can accelerate rotting.
Glue Gun and Glue Sticks. I’ve found that a hot glue gun works best. I’ve tried spray adhesive and craft glue with little success; the glue gun gets the job done every time and doesn’t harm the pumpkin or the plants. Hot glue also dries very fast, allowing me to move through this project quickly. I treated myself to a new model this season and you can find it HERE (#ad). It comes with four interchangeable brass nozzles and the longest one was perfect for this project! I was able to apply glue to even the smallest succulents without burning my fingers. There was also minimal dripping and no clogging. It comes with a pack of 10 glue sticks. I used about 1/2 a stick per mini pumpkin. Highly recommend!
Spanish Moss. You only need a handful for a small pumpkin, but obviously get more if you’re doing larger pumpkins or LOTS of pumpkins. You can find this at almost any craft store or order some HERE (#ad). If you prefer green, sphagnum, or colorful reindeer moss, go for it. Whatever you choose, don’t skip this ingredient! The moss will be the medium for getting water to the succulent roots. It also fills gaps and looks great peeking out beneath the plump leaves.
Succulent Cuttings. These are offshoots or stems from a succulent plant that have been cut off. They can survive as cut foliage for weeks without soil! I’ve always purchased mine online from The Succulent Source, a family-owned business in Southern California. The cuttings arrive carefully packaged and in beautiful condition every time. The cost runs about $0.67 - $2.50 per cutting (depends on size and type) plus shipping. You can order an assortment and specify the shapes and colors you prefer, or you can keep it simple and buy an “Everything but the Pumpkin” kit.
Pro tip: For each mini pumpkin, you’ll want 7-10 cuttings in the 1.5” size range. Increase the size and quantity of cuttings you order as you increase your pumpkin size.
HOW TO MAKE YOUR SUCCULENT PUMPKIN
Step 1: Wash and dry your pumpkin completely.

Step 2:
Apply a zigzag of hot glue directly onto the flesh of your pumpkin, creating a crown all the way around the stem. This won’t hurt the pumpkin.
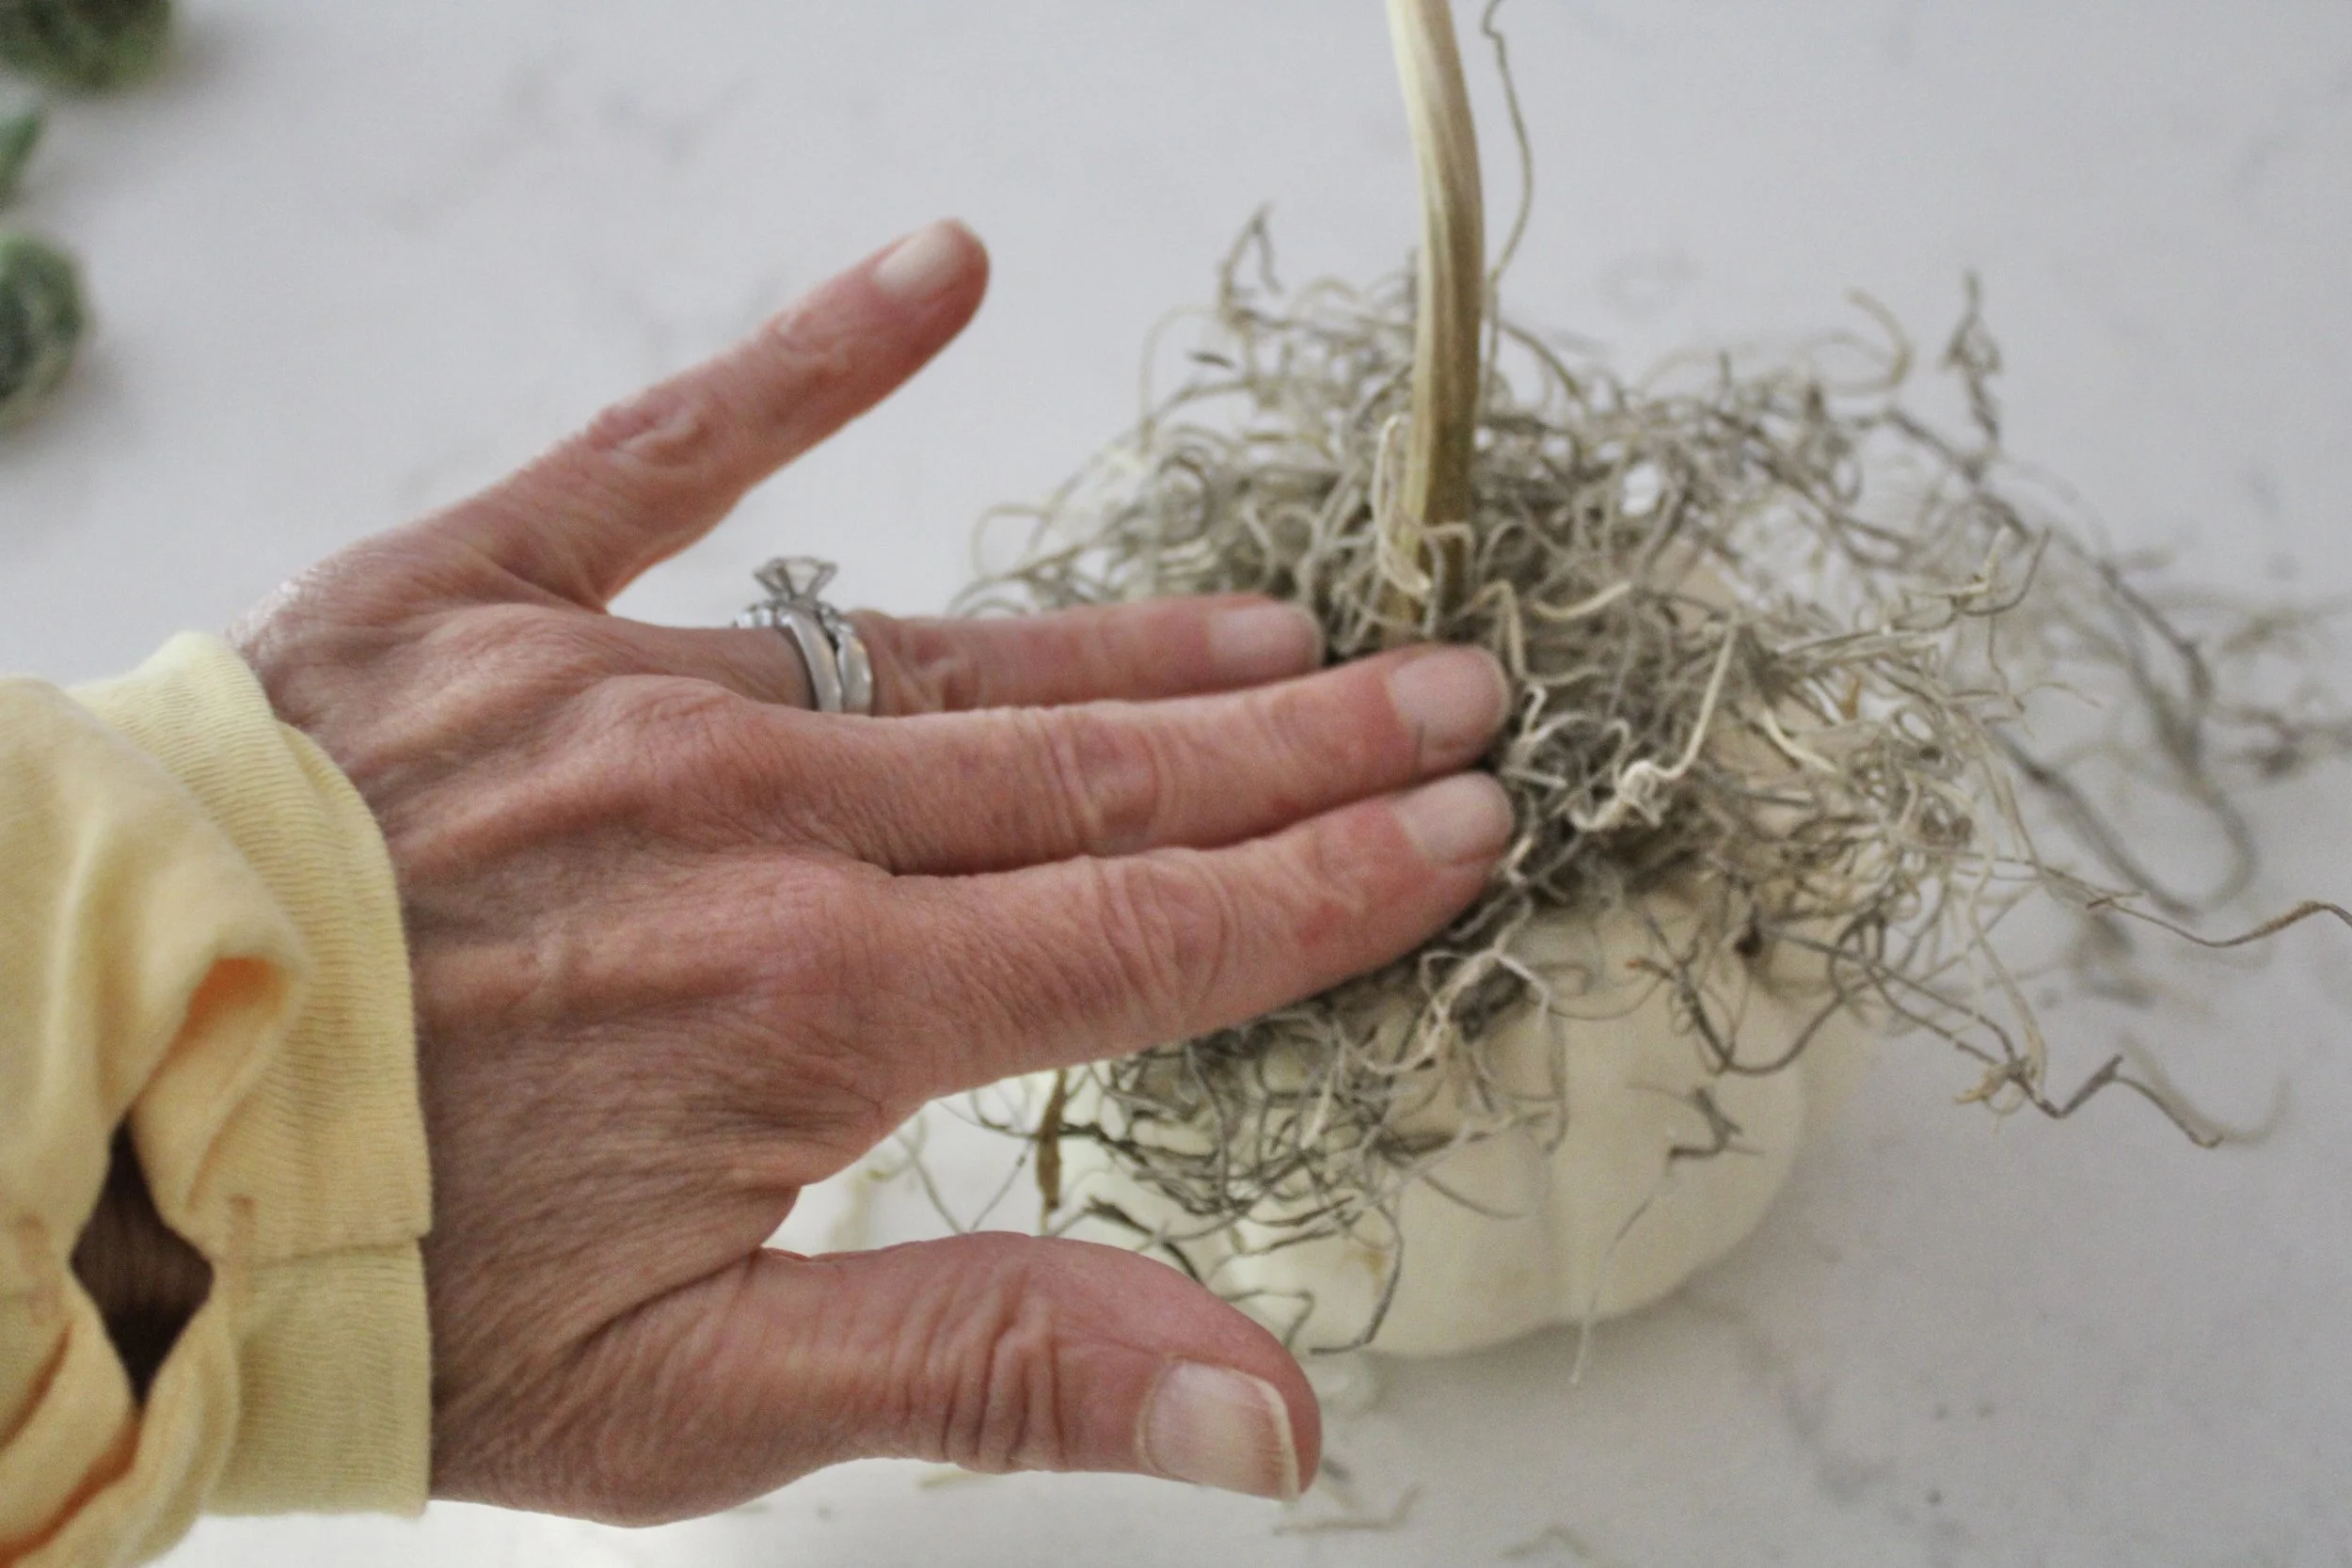
Step 3:
Quickly but carefully press a “nest” of moss into the hot glue. Trim the extra moss with scissors, or keep it on the wild side.
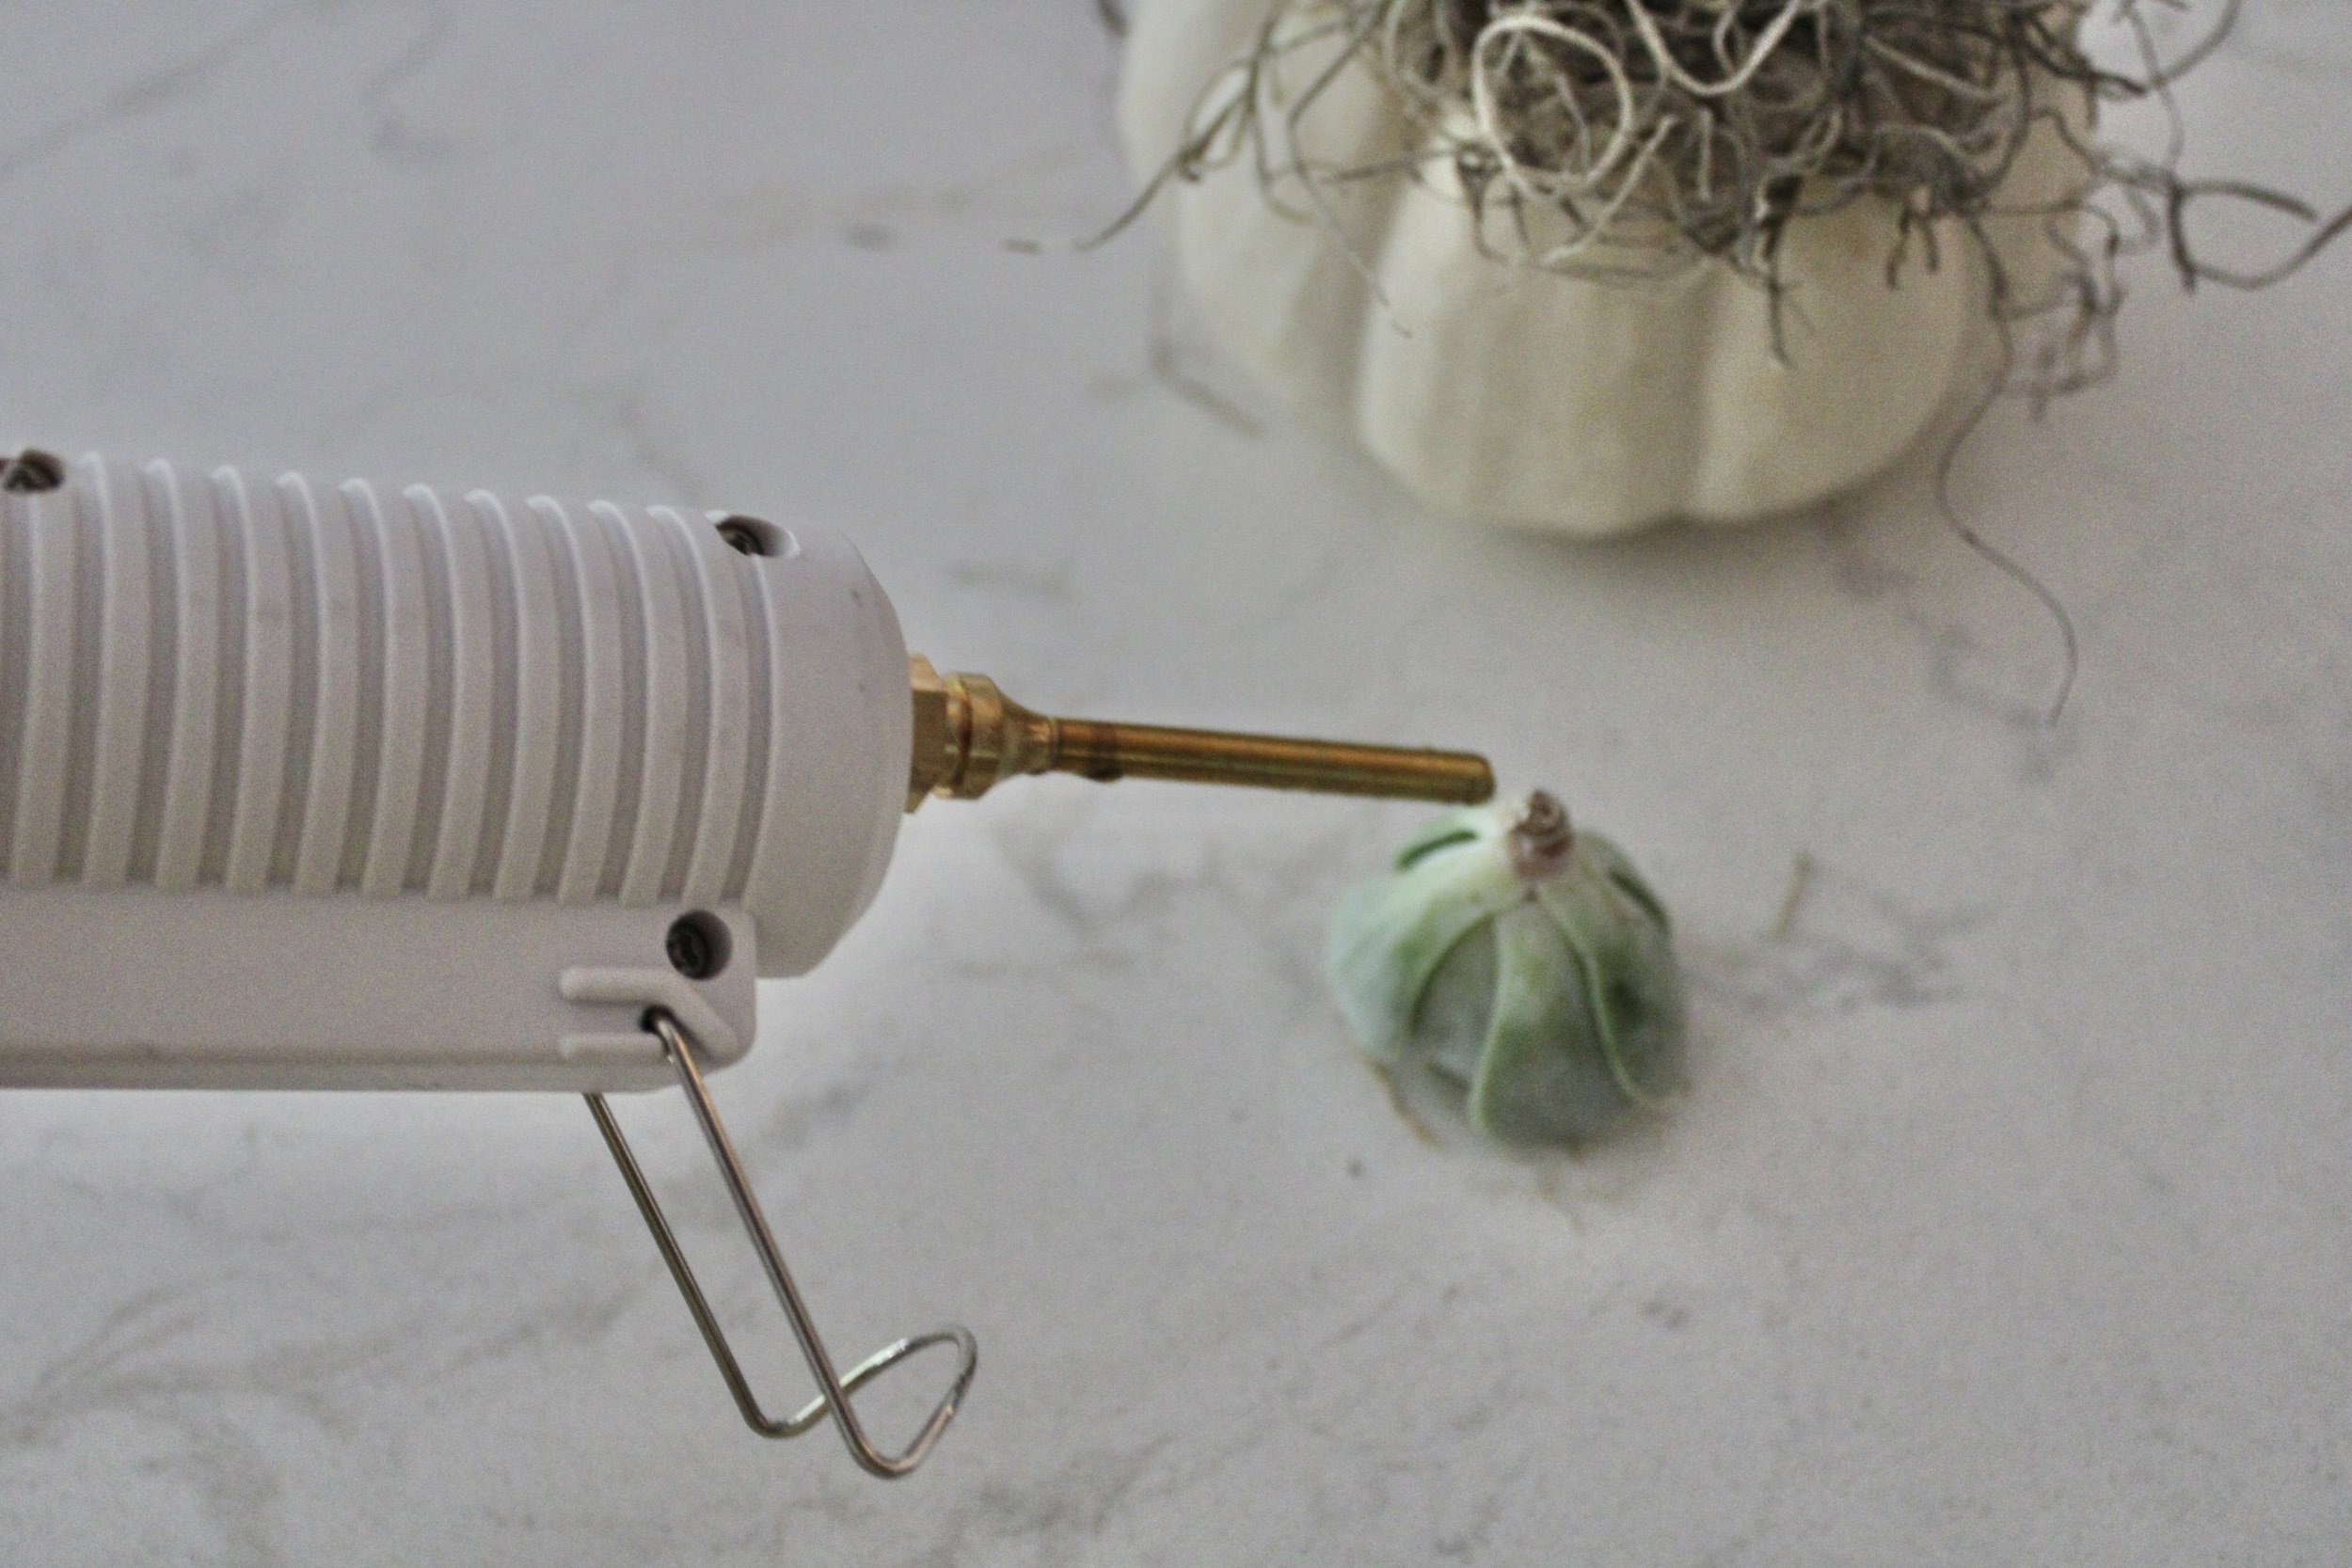
Step 4:
Put a bead of hot glue directly onto the stem of each succulent and press into the moss until you feel it stick.

Continue adding as many cuttings as you like, varying the colors and shapes as you go. I only used succulents here, but you can add small pine cones, berries, acorns, feathers, or other petite seasonal accents!

caring for your succulent pumpkin
Location. Keep these indoors in indirect light, away from heating and air conditioning vents. Avoid direct sun, rain, and cold temperatures. They can be outside for a few hours to decorate your patio table during a party, but I would bring them back inside when the party’s over.
Water. Your goal is to saturate the moss once or twice a week. The succulents will eventually grow new roots, which will pull the moisture they need from the damp moss. I find it’s easiest to hold the pumpkin under a gentle shower of water in the sink, tilting and rotating it so the water gets to the moss beneath the cuttings. Once the moss is really saturated, tilt the pumpkin to release any extra water. You can also use a turkey baster, medicine dropper, squeezie bottle with a spout, or even a spray bottle to moisten the moss.
WHAT TO EXPECT FROM YOUR SUCCULENT PUMPKIN
With proper care, your creation should last 2-3 months, or as long as the pumpkin lasts. At this time, gently remove the cuttings from the moss and either propagate them or use them in another craft project. To propagate, simply lay the stems down in a saucer of potting mix made for cacti and succulents. Water the mix once a week. When you see new roots forming, transplant the cuttings into small pots filled with more potting mix. Or, put the cuttings to use right away in another craft — try gluing them to a moss covered cone, an indoor Christmas wreath, or even the base of a pillar candle.
In truth, even with the best care, some of your succulents might not last as long as you’d like. It happens. If you see some of their leaves turning odd colors or drying out, just remove them. If a rosette dies, you can remove it and replace it. But in general, I’ve found them to be tough little plants that can handle some neglect.
MORE resources
I certainly did not invent the succulent topped pumpkin! I first learned this technique while at a container gardening conference, where Laura Eubanks of Design for Serenity did a live demo and I was immediately hooked. Another Laura, of Garden Answer, has a great video demonstrating her approach HERE. Everyone has their own spin on this DIY Pumpkin Project and it’s fun to experiment with different pumpkins, gourds, mosses, and succulents. Give it a try!
For more natural Fall inspiration, visit my container gardening portfolio HERE. If you like they way I teach, register for my online course Fall Container Gardens, or try one of my seasonal Planter Recipes.
Please leave a comment below or email steph@containedcreations.com with questions. I respond personally and I’m happy to help!
XO,
Steph
PS: As an Amazon Associate, I may earn a commission on the sale of featured products that are purchased through the links I’ve included.